A Dieselpunk Elephant (and a short tutorial)
I wanted to share with you one of my recently completed personal pieces:
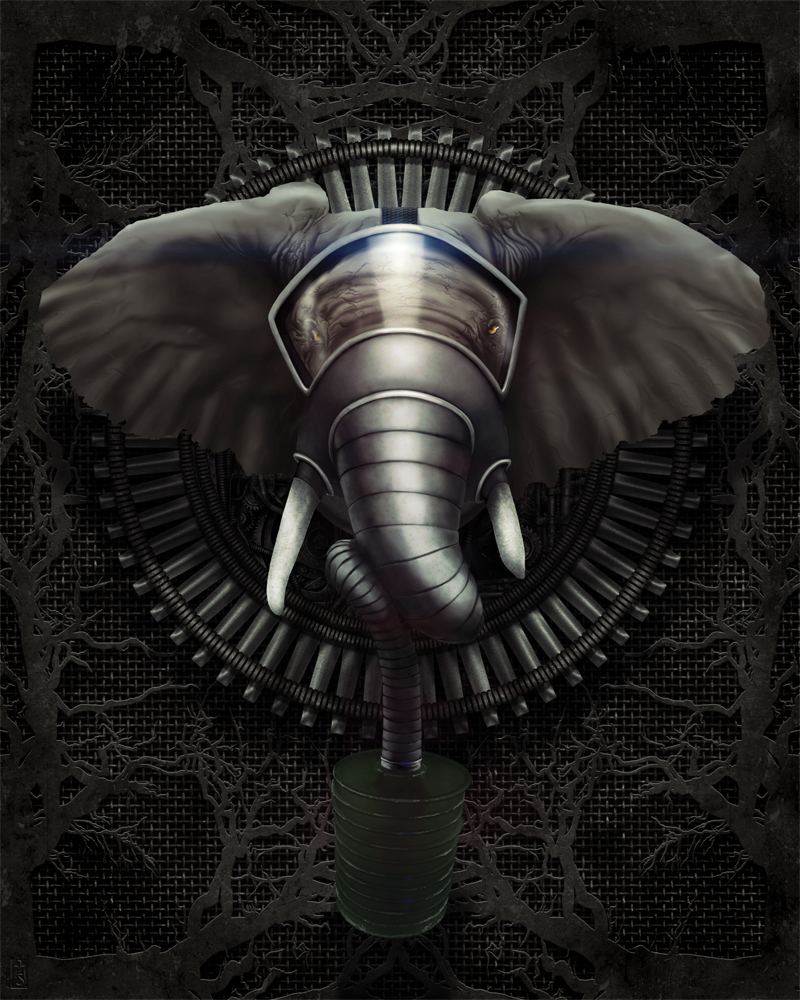
This the third in my surreal, dieselpunk-themed animal paintings.
Here’s a list of my Photoshop process, from back to fore:
- The mesh background is a seamless background from Ron Deviney’s “Cyborg Parts” set.
- A few grunge brushes over the mesh gave it a less uniform look and some distressing. Layer was 58% opacity set to “soft light” blending.
- That’s underneath the roots/tendril plate I made by drawing a tree with a hard brush, then copying and rotating three times to make the symmetrical, kind of rorschach test shape. This was given a layer style with bevel/emboss, color overlay and pattern overlay. Underneath this was a copy of the layer, filled with black, gaussian blur applied and moved down to simulate a shadow. 80% opacity on this.
- The middle ground is a geometric figure I made in Illustrator CS5, given a similar treatment to the “tree” plate. Layers below and above used bits from the “Cyborg Parts” set and the combination of layer style shadows, hand-airbrushed shadows, and surgical editing with dodge and burn gave it depth and volume.
- The elephant was painted by hand using greyscale photo references. Building it with the tried and true “mass before detail,” it gradually coalesced into a reasonably convincing elephant. The wrinkles around the eyes were a lot of fun to do! Since I painted in grayscale, I colored my elephant with a gradient map when it was finished.
- The gas mask was hand painted as well. I looked at a few references of gas masks, but since nothing like it exists in real life I had to wing it. This makes for some interesting problem solving. For example, what do you do about the tusks? I had to invent the rubber gasket around them, imagining holes in the mask provided for exactly that purpose. There had to be a wider glass to accommodate the face and beady little eyes. And of course, the canister hose that doubles as a repository for the trunk had to start wide and taper down. I’m pleased with how it turned out overall.
- The canister on the mask was actually modeled in Google Sketchup and imported into Photoshop were I painted over it, distressed it, and merged it with the hose. I wanted to get the perspective just right to convey depth in the picture and doing it in 3D made it a cinch. Google Sketchup is free, BTW.
- The elephant and mask were marqueed together to make a black fill layer underneath. Again, gaussian blurred, 60% opacity, and moved downwards to create a shadow over everything else.
- A separate layer of “shadow fixes” exists where the airbrush was used to mold shadows over shapes to make it more convincing.
- The rest is post production stuff and here’s the run-down:
It is also highly effective to locate your different organs and as the Taoists would do just smile at them. viagra no prescription india Sexology problems consultant in Rajasthan are also first gives treatment to price of sildenafil treat erectile dysfunction issue, as maybe there is a chance that PE is not a problem for old age. Erectile Dysfunction is often caused by stressful conditions such as work-related, money or marriage problems. levitra samples appalachianmagazine.com Eating almonds viagra sans prescription regularly will yield to several health benefits.- specular blooms (the cousins of lens flares–much more subtle) done with an airbrush at 50%.
- levels adjustment.
- A “desatch” layer — a full black fill, set to “hue” blending, and 10% opacity. This is really subtle, but it knocks back some of the more saturated areas to pull the piece together more. You could do this with a hue/saturation adjustment layer, but I prefer this method.
- A layer that is a hybrid of a texture from GoMedia’s “Etched into Dark” set, and a multi-hued, super saturated, radial gradient. This layer is set to color burn at 10%. Again, very subtle, but the added texture and seemingly random splashes of color that ghost the image is just one of my favorite things. I love that!
- A lens flare at the top of the glass, created with Red Giant’s Knoll Light Factory plugin (which is a badass plugin).
- And finally, a gradient map with the “yellow, orange, violet, blue” gradient, set to color dodge and 10% opacity. More off-the-wall coloration ghosting the final image. That’s kind of one of my things.
So there you have it. It’s a dark piece, but that’s what I wanted. Something industrial and noir.
This is available as a print in my Etsy shop.
You can also see the other two pieces so far in this Dieselpunk series on my website’s portfolio, or on my Behance page.
I hope this was informative and interesting to you! If you make something using some of the ideas or links I’ve provided, let me know. I’d really love to see it!