Badass Lighting #2: Specular Bloom
My last post started the topic of “hyperreal lighting” by dealing with the fresnel effect. Now I want to move on to the second kind: specular bloom.
Specular bloom is related to the fresnel effect and, under the right kind of light, includes fresnel lighting. However specular bloom also includes more direct surfaces (rather than mainly grazing angles) and can also be from the light source itself. It also known as “diffuse glow” and describes how a bright object will create a corona around it; it will have a sort of halo that “eats” into the surrounding objects.
Notice in this photo by Fred Stein how the street light “eats” into the building and the figures.
I’ve seen tutorials online on how to create an overall specular bloom effect, but just like everything else I talk about it’s always better (in my opinion) to do it more or less by hand instead of letting filters or layer styles do it for you (although there is nothing wrong with using filters in the process, as we’ll discuss).
Key concept: it’s not necessarily about logical adherence to real physics, it’s more about artistic interpretation.
WHERE in the COMPOSITION?
Intelligently scouting out where and how the bloom effect will be applied is important. Some suggestions:
- The sky: direct light from the sun or diffused light through clouds. In fact, the sun (and even a full moon) will punch through clouds to some degree and create the illusion that the clouds are behind it.
- Diffused light through clouds without a sun or moon disc look great with a bloom.
- Artificial light: lamps, lights and machines. Neon, halogen, fluorescent and gas are all viable, and will have differing characteristics.
- Combustion: fires, explosions, candles, fire places, pyres, torches…anything
- Windows with either sunlight or artificial light streaming in.
- Reflections on metal, glass, and other smooth surfaces. Even leather, skin, hair, and other materials can possibly have it. Be selective and question yourself.
Like I said, the effect can either be the result of a light source, or from an intense reflection. Learning to tastefully select where the effect will be applied takes practice (and healthy screwing up). If you do it too much, than the piece will end up looking like you’re seeing it through vaseline. Maybe that’s what you’re going for, I dunno. I don’t like it overdone because it looks amateurish. As soon as people get a taste of Photoshop’s power they go bonkers with it. I always remember what my friend Randy used to say to me: “Pump the breaks, hard-charger.”
APPLICATION
Method #1: Do it by Hand
Ninety percent of the time I paint it in by hand. Use a soft brush, set up like an airbrush just like in my last post at 20 to 50% opacity. Once you get a deft hand for controlling it you’ll be able to wash an area with light in just the right spots without overdoing it.
Many times I’ll zoom out and make the brush larger than the light source and just tap it. Setting the opacity at 10 to 20% will make using the mouse viable again and I may point and click where I want it for increased accuracy. This is useful for candelabras, street lights, or other arrays of point light.
The majority of techniques out there for creating specular bloom include heavy use of “overall” effect editing. This is ok if you need the whole piece to have a certain look, but many times it starts to scream “FILTERS!” and I don’t like that. Learning to brush it in by hand gives you so much greater control over the entire composition that I highly recommend it. Nonetheless, knowing how to do an overall wash-cycle is still a useful tool to have in the box.
Method #2: Screen Layer
For an effective overall effect. Either duplicate your base layer (if the image is flattened), or create a merged layer on top (shift+option+command+E on a Mac; shift+alt+control+E on a PC). With this new layer you can go one of three routes with it:
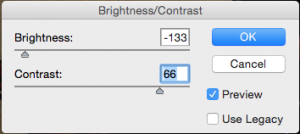
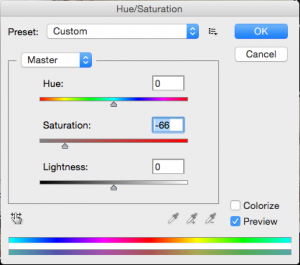
- Image > Adjustments > Brightness and Contrast, and cut the brightness way down and blow out the contrast. There is no set value scale; every piece will be different, but you’re aiming to get the image mostly dark or even black with a few bright spots in it. Pumping contrast always boosts saturation, so go Image > Adjustments > Hue and Saturation, and cut the saturation by at least 50%.
 Or…
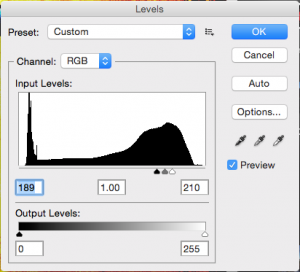
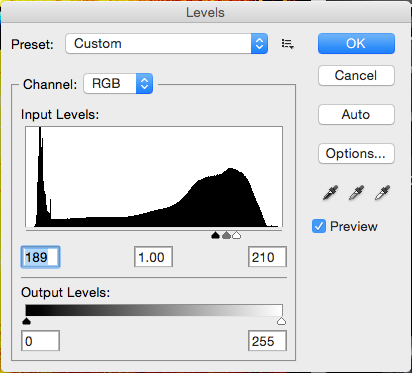
Or… - Image > Adjustments > Levels, and bring the end point sliders closer together under the highest part of the histogram to crush the image (you’ll have to cut the saturation here, too).
 Or…
Or… - Image > Adjustments > Curves, and bring the middle down and to the right so that it’s super steep, short, and mostly in the right. You may need to cut the saturation with this method as well.


However you get there, the aim is to have an absurdly contrasted image that’s black or mostly black, with light shapes representing your illuminated areas. Now apply a gaussian blur. The radius depends on how big your piece is. I work at 16×20 so I can start as high as 10 to 20. Smaller canvases for the web might need to start at 7 to 10. You’ll have to experiment. Now set the blending mode to Screen, and adjust the opacity to your taste.
Additionally, you can stack the effect by duplicating this bloom layer, reapply the Gaussian Blur with a higher radius, and decrease the opacity even further to allow the effect to bleed out more. Repeat as necessary. I’ve seen Val Cameron do this with up to four layers and it looked pretty cool. He even used a Curves adjustment to tweak the color cast on these layers for some interesting variety. Obviously, every piece is going to be different and your style will also dictate how this is applied.
Method #3: Select Color Range
My least used way to achieve the effect is to Select>Color Range and select your brightest value(s). A night scene may have some streetlights, an old house interior may have candles, a metal object may have reflecting surfaces, etc. In any event you’ll select right at the heart of these brighter areas. Use the selection to fill a new layer with one of the whites I use (pure white #ffffff, titanium white #fffffb, or zinc white #fffbf9). Give it a Gaussian Blur from 3 to 10 pixels. Make this layer “lighten” blending mode. Adjust opacity. Mask and/or erase with a soft brush as necessary.
This method works especially well for luminous skies because you can cover a lot of cloud real estate quickly and completely. I usually go back through it and partially erase or mask out near the edges of the piece. I always have to massage and tszuj things around. Honestly, method #2 works just as well for me, so use whichever makes the most sense to you.
Additional Approaches
Any one of the above approaches can be massaged even further. They are not destinations, merely weigh stations on the journey.
Add a layer mask to the light effect and render clouds in it. Apply motions blurs instead of or in addition to the gaussian blur. Move, invert, flip, distort subsequent layers to create interesting effects. Add bokeh, beams, and variations on everything.
Here is a smattering of good Photoshop tutorials that take the same thing and come at it a little differently:
- Tutorial at Aversis
- Tutorial by Ofer Zelichover
- Vimeo lesson by Konstantin Magnus (excellent post-work all around here)
EXAMPLES
This little graphic I did for my Black Dog Pet Portraits shop on Etsy shows a slick little bloom in the upper left corner. Adding a long shadow under the main graphic helped sell the luminance I was creating. See how it “eats” into the text and the edge of the graphic? (I have a full work up on this graphic in an older post)
Similarly, in this quick & dirty “Ronin” illustration I did originally for my Faux Thermal Imaging tutorial, you can see the large bloom in the upper-left corner. In conjunction with the particle effects in the foreground and lighting on the subject, a very cool, dramatic light effect is created. That bloom is just airbrushed white on a black background set to screen blending mode. The gradient maps and color layers on top of the stack do the work of sewing up colors and creating a unified “look.”
As before, let’s also take a look at my “Flyby” painting. The center of the accretion disc surrounding the black hole has a glow around it, painted in white. This is the area where the swirling gasses would be moving the swiftest and getting the hottest. Notice also how it eats into the actual black hole; there’s not a razor edged line there. Likewise the blue glow from the ship’s engine is technically a diffuse glow, along with the subtle, tiny halos on the red running lights closest to the viewer.

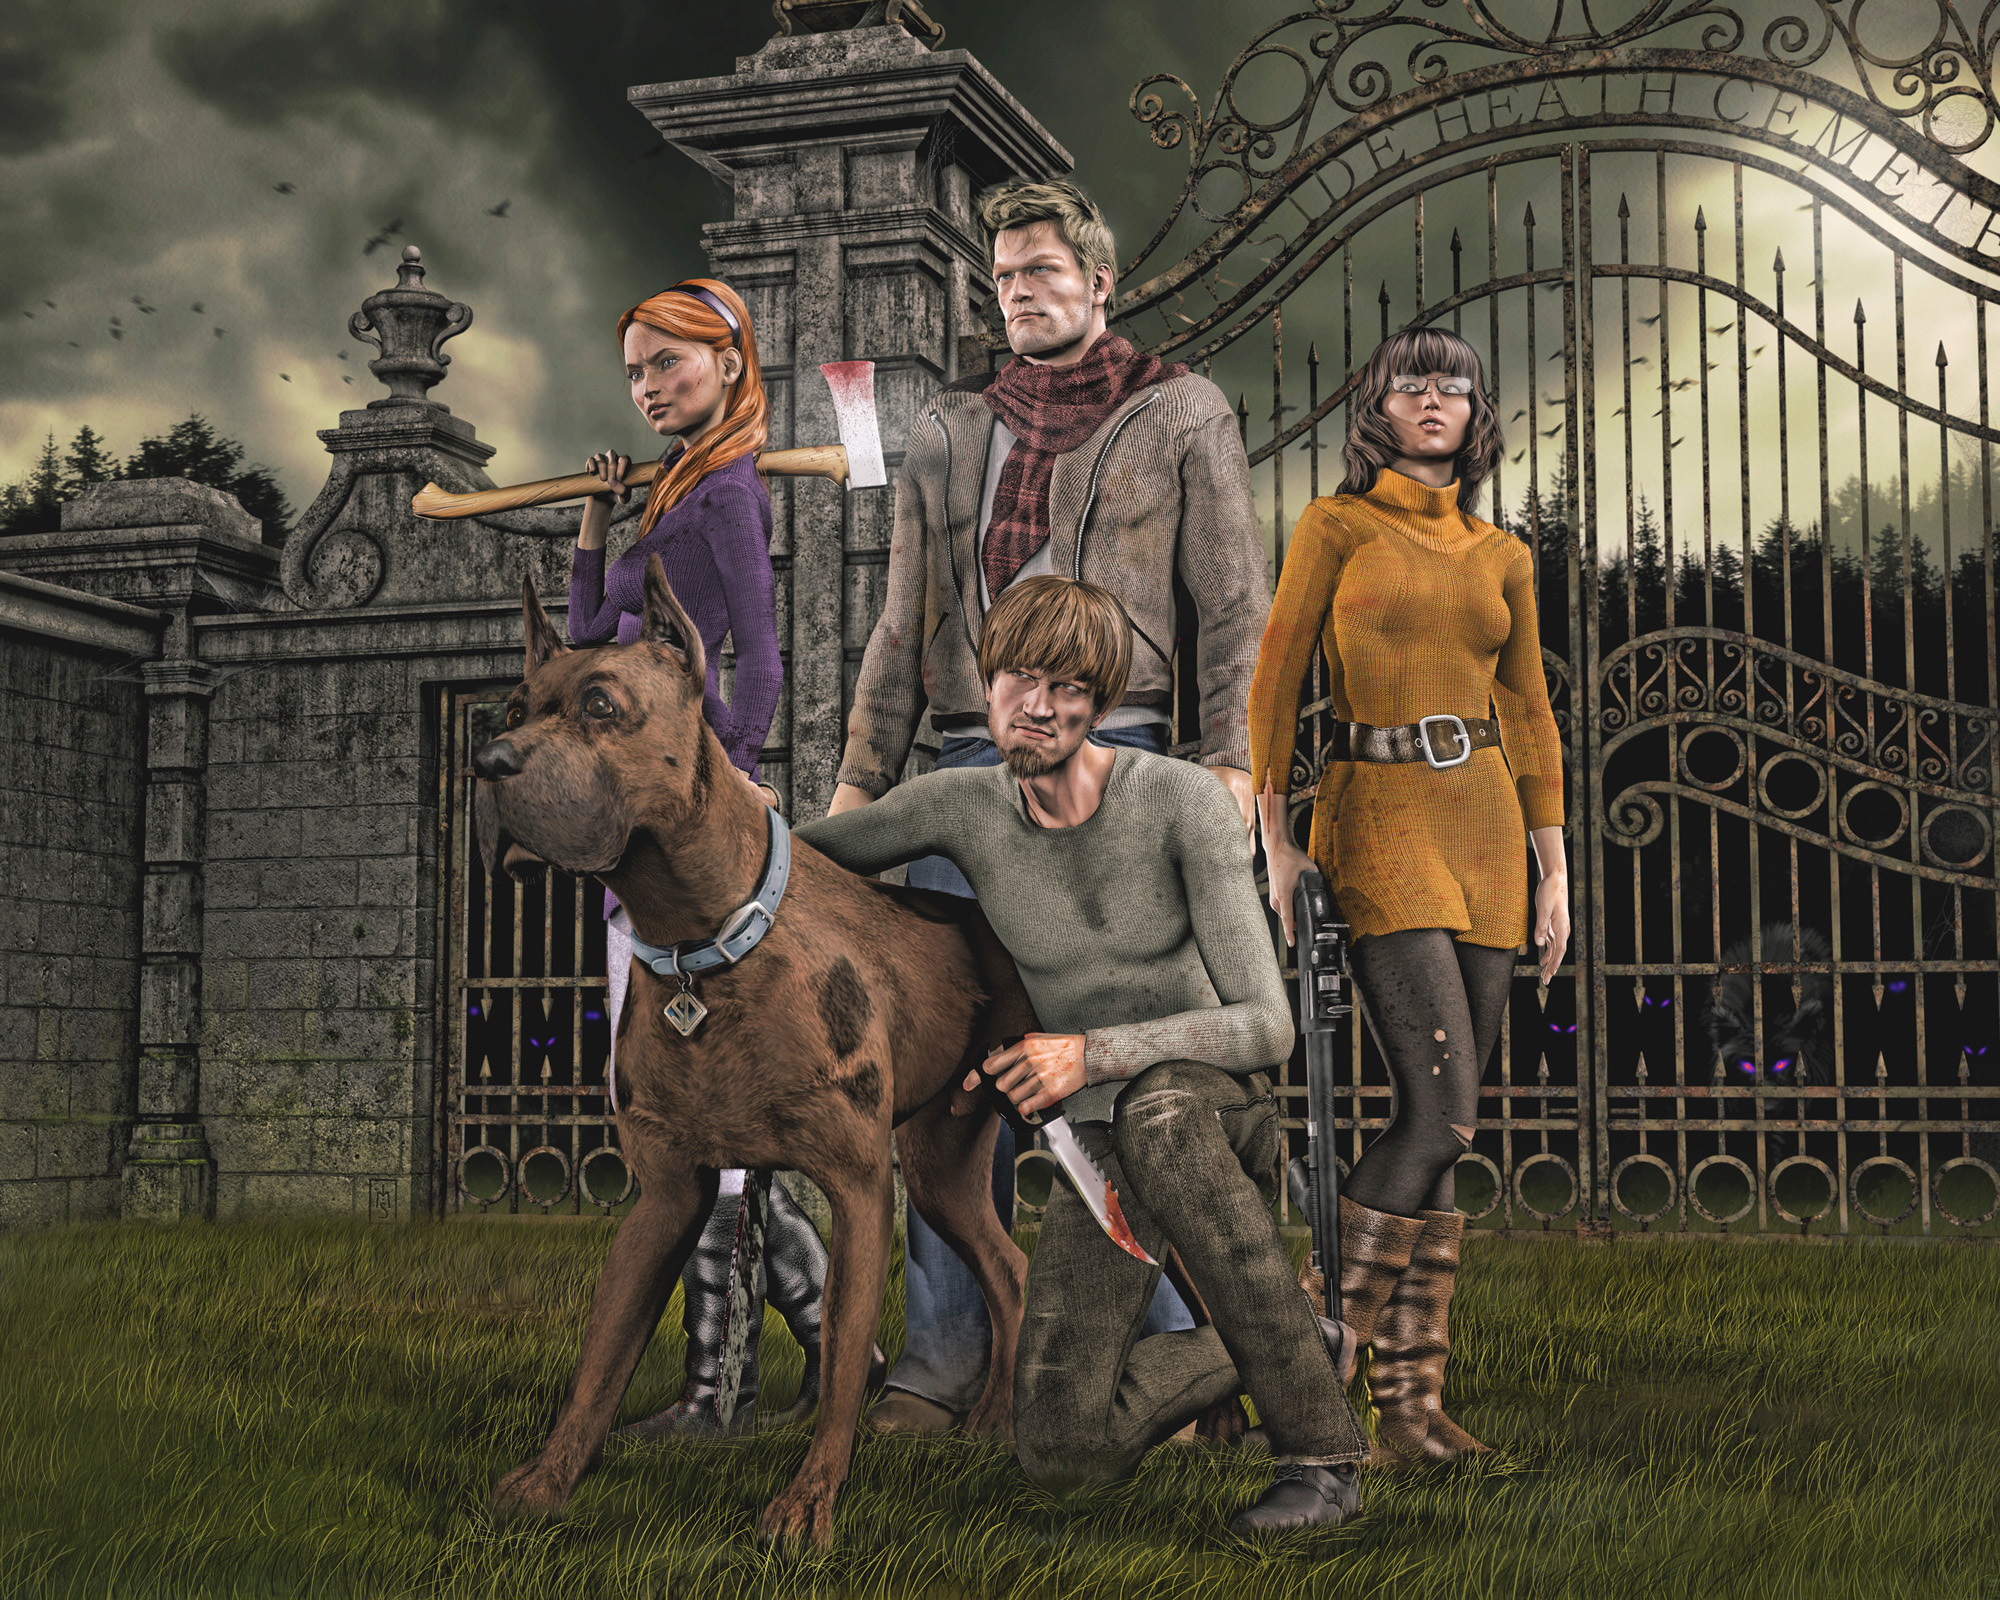
Also in “The Gang,” there are two spots where the effect is most obvious: on the head of Daphne’s axe, and from the sky through the gate in the word “Cemetery.” One is a reflection, one is a direct light source (in this case a fill light from the clouds). Specifically, see how the second one “eats” into the metal lettering. Additionally, I have applied very, VERY subtle applications to Velma’s belt buckle, Daphne’s headband, Scooby’s collar buckle, Shaggy’s knife, and Fred’s zipper. You want to think as these bits as aggregate that, on their own, are nearly nothing, but as a whole add up to something good.
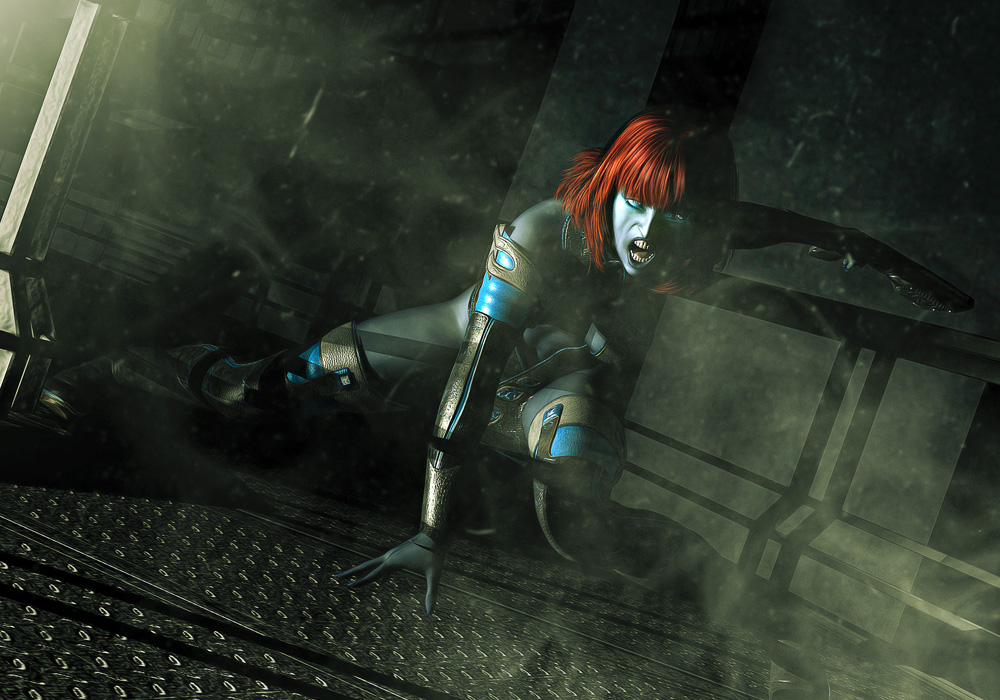
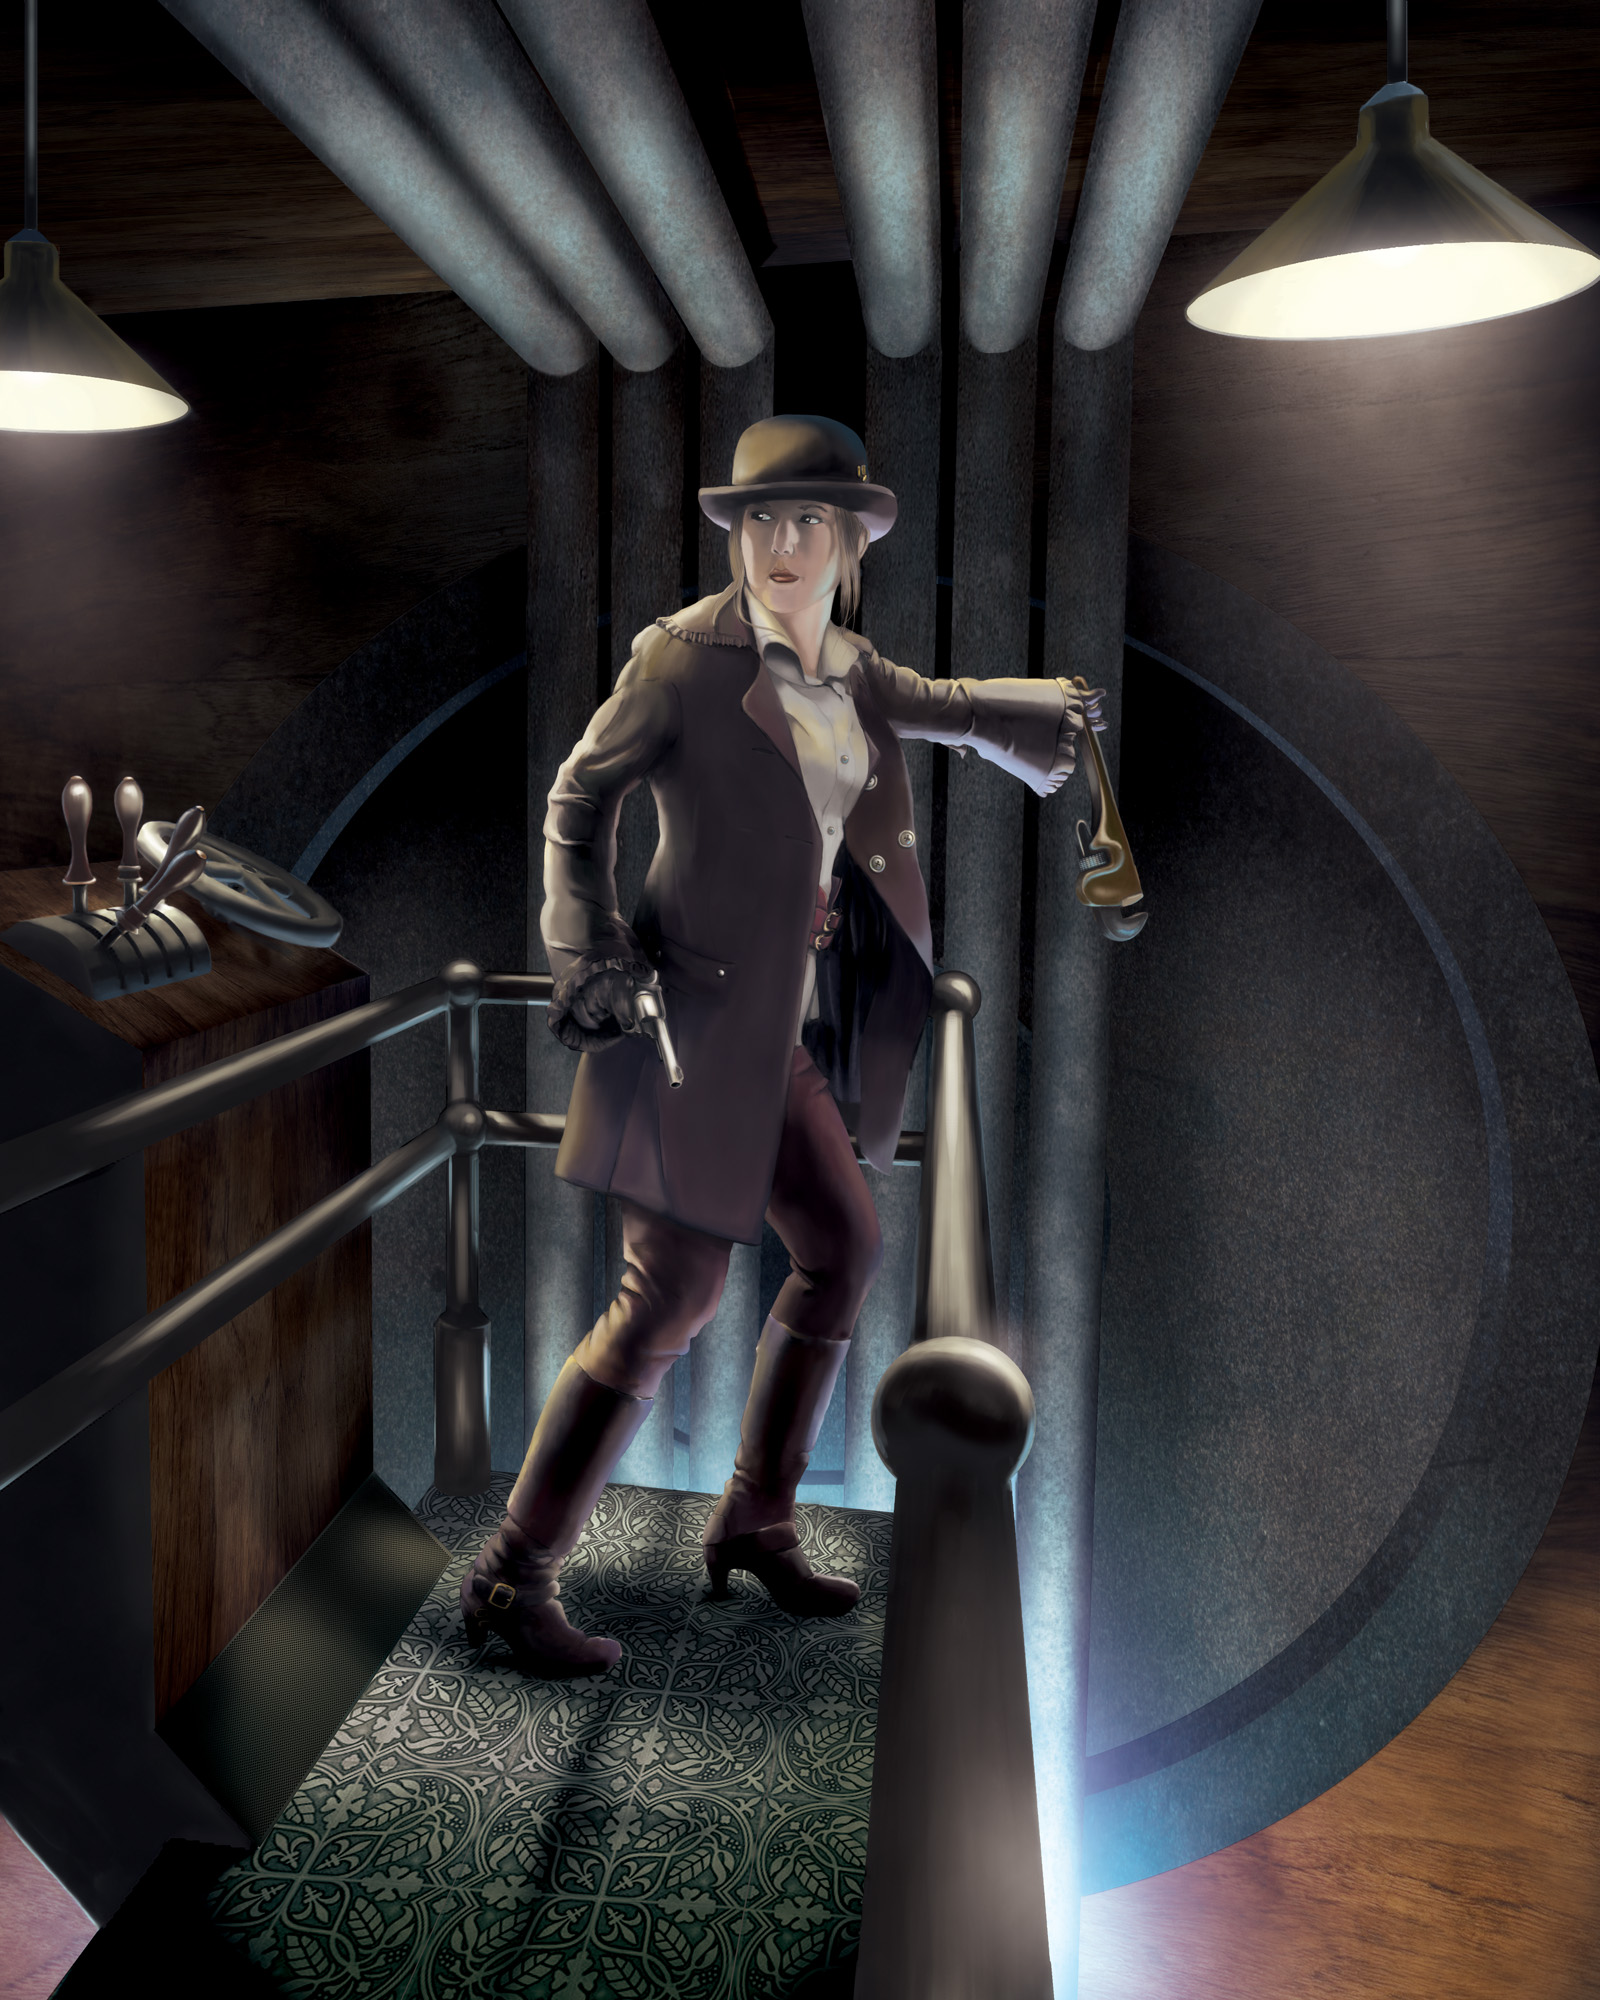
Finally, in this older piece of mine, “Saboteur,” you can see several instances: the hanging lights, most obviously; reflections off of the controls and the railing; reflections on her buttons and gun.
ATMOSPHERE
The intensity of a specular bloom is dictated largely by what’s between the light source and the viewer. If you read my last post about the fresnel effect and grazing angles, it’s important then to understand that a specular bloom is really nothing more than the aggregate of thousands of fresnel effects from particles in the atmosphere. Most of the time, it’s dust, those same little floaters you’d see in a sunbeam. If there’s rain, fog, snow, wind, or other meteorologic factors then the specular bloom increases. Incidentally, these factors are why we see sunbeams in the distance and lasers beams in foggy concert halls. Even in space, the presence of dust will create this effect, especially around nebulas, comets, planetary rings, etc.
The headlights on the airship in my “Airships in the Fog” demonstrate these factors.
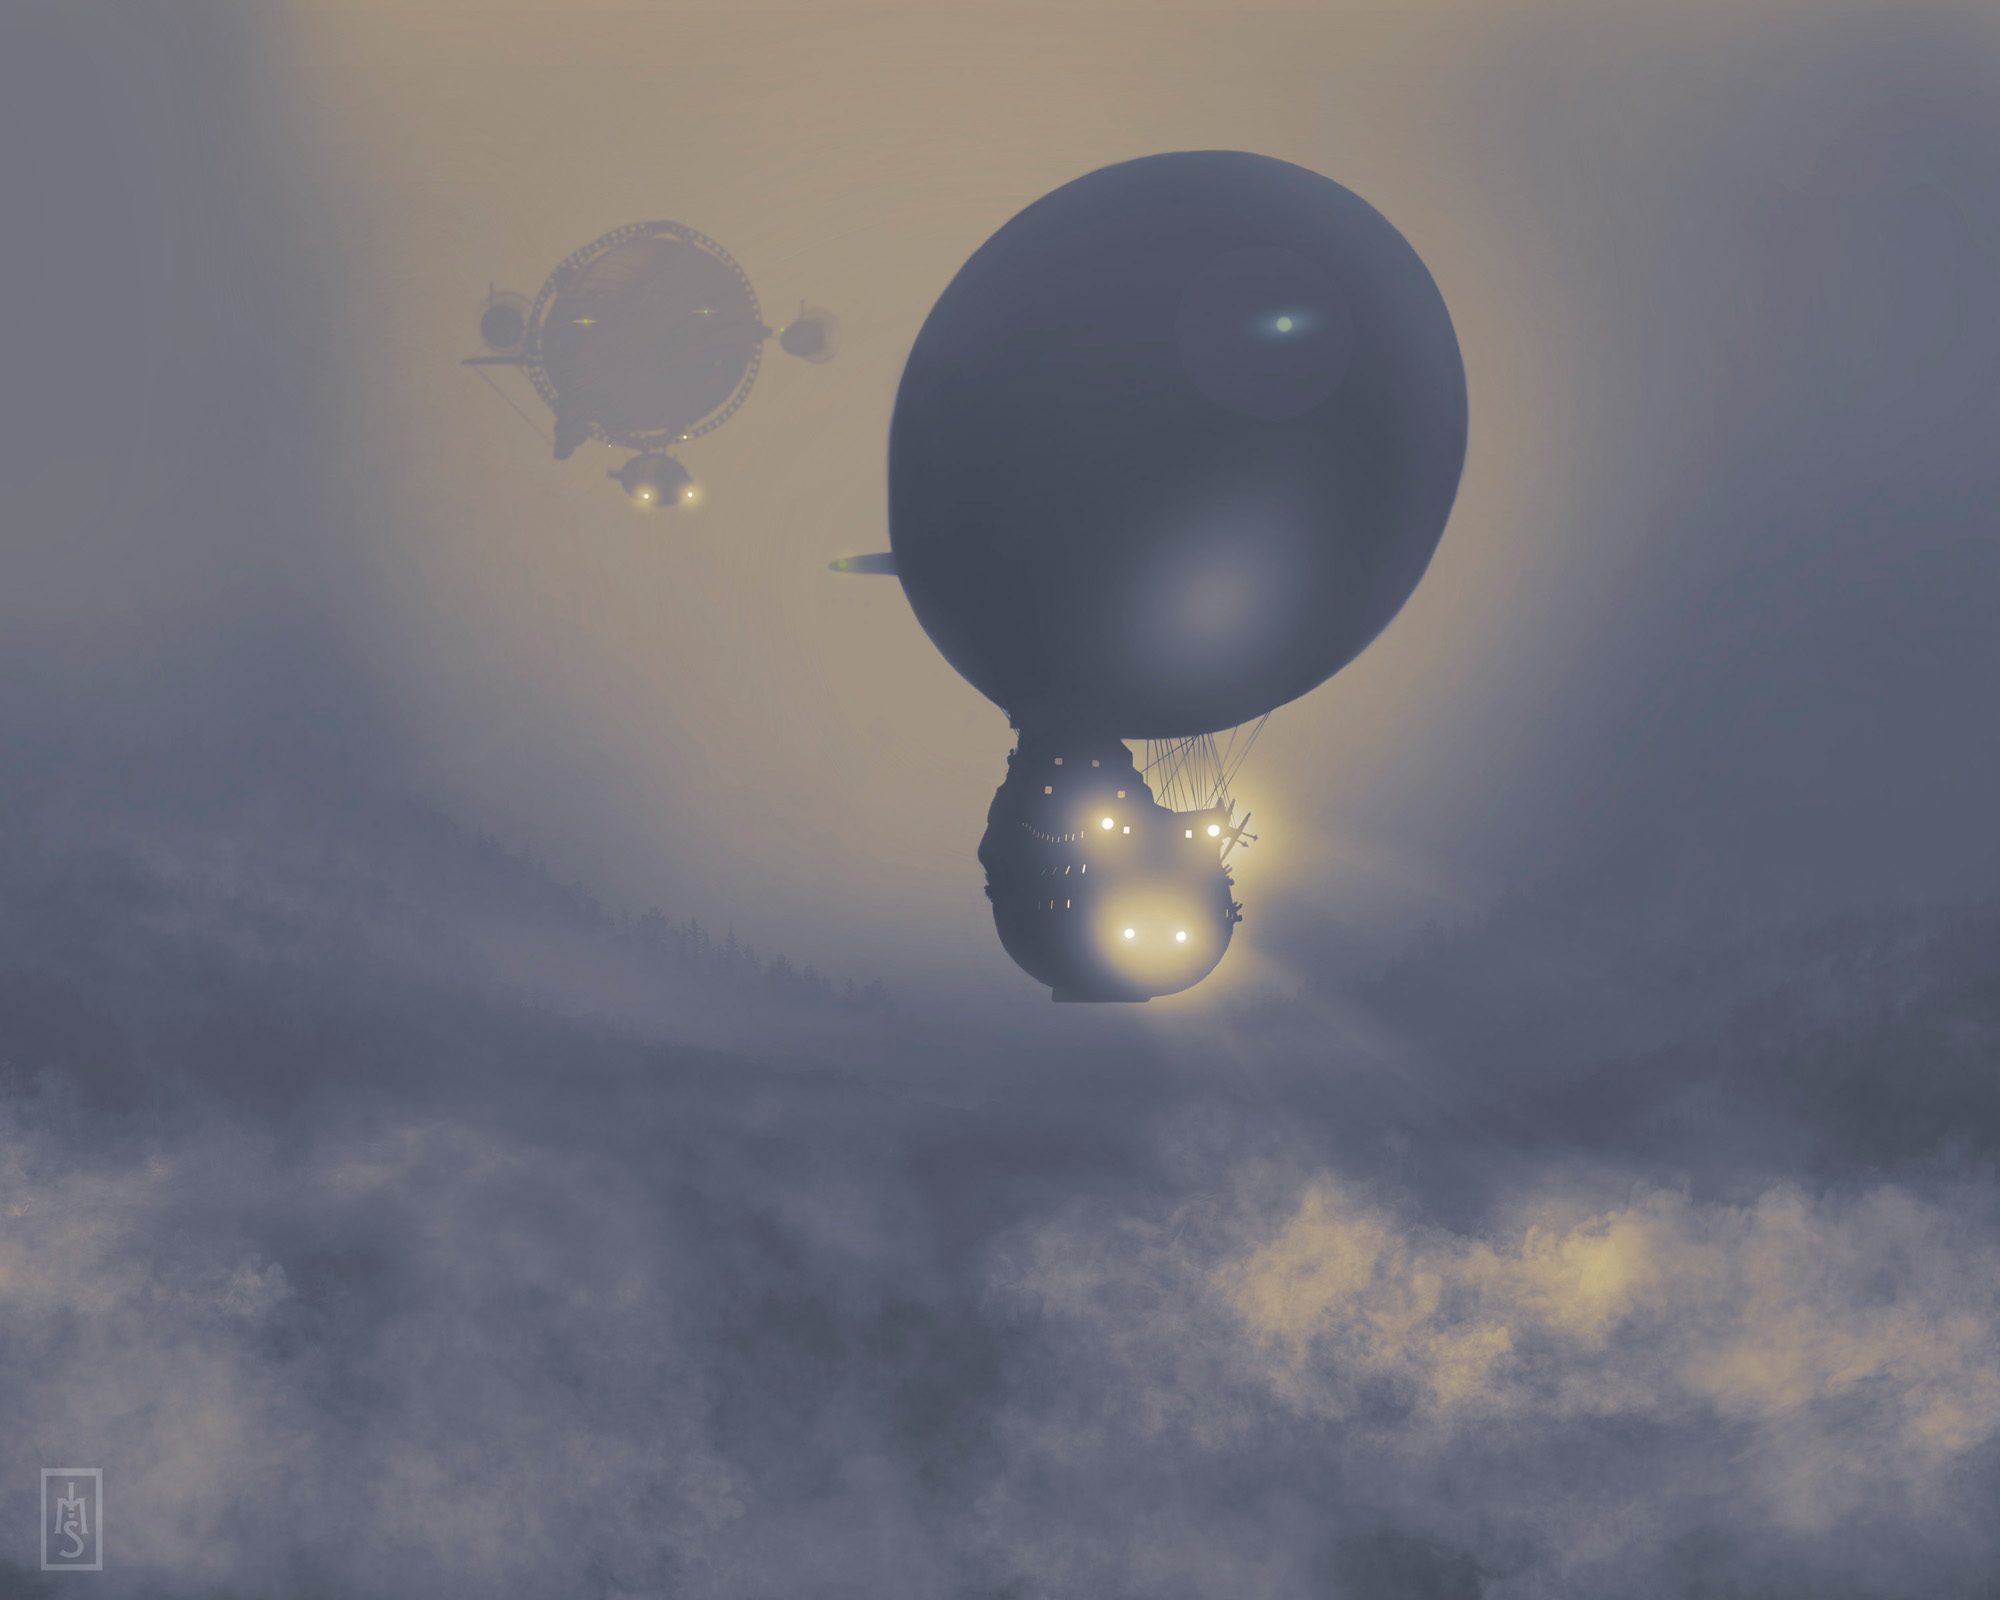
The particles in the thick fog have provided ample reflective surfaces for both intense specular blooms from the lights as well as the beams through the fog’s billows, PLUS the dense layer below provides a canvas for the beams to reflect off of below the ship. These all add drama and depth to the piece.
Incidentally, the Fred Stein example from the beginning of this post displays similar atmospheric effects very well.
Your style and taste, will ultimately be the deciding agent. Adding a little drama by bending the laws of physics may serve you well. That’s kind of my M.O.
Next up: Badass Lighting Part 3–Lens Flares. See you then!